As you may recall, I dipped my toe into the world of solar panels and batteries in relation to taking my pond off-grid. CLICK HERE for PART 1.
Well, how things have moved on since then! I have learnt a lot, I have spent a lot, but as with all things, if you get it right first time, it's a fluke and you've probably not learnt anything - that's what I keep telling myself anyway.
BTW - legal disclaimer, all this information I post on here is not the advice of a professional who does this as a job - this is information posted by me, as a hobbyist, an experimenter, a learner - so, if you follow any of the information here, you do so at your own risk - basically, if you are stoopid and end up burning your house down, don't come moaning to me that I mis-typed something or I mentioned something that you later relied on and that then burnt down your house. Accept some personal responsibility. Be an adult.
right, now we've got that out of the way, let's proceed with the latest adventures of solar-pond.
This will be photo heavy - and that is more for me to look back on and examine rather than just for the sake of taking a lot of photos - I can clarify that I started doing this rite-up and before I got to the end I actually have the entire pond running from the solar / battery setup..... during the day, all is good. Let's see how long it all lasts over night. Also, I've never been so obsessed with how many watts things consume! I'm sure one of the pumps I have in the pond is pulling around 50w - just to pump some water up in the air about 6foot for it to flow down a waterfall, think I'll be looking to replace that pump, maybe even with a 12v DC version... hmmm...
Right, where do we start? At the beginning....ish... As per part 1, I thought I had stuff setup okay, so I thought I would make it waterproof and move the solar panels back up in the air, mainly so they can sit at 38degrees - why that angle? well, according to HERE that's the best angle for sunlight.
Also, using those really useful containers as water-proofing was never really the long term plan.
Fist step - trip to Wickes to see what wood I can get, as I'll be in a small Fiat 500, I cannot get any 2m lengths, so will have to get some smaller 1m posts - I only need to secure them to the existing pagoda to be able to angle them for better sunshine/UV light capture.

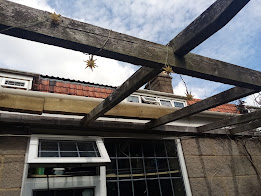
Yep, they'll do - and yes, I did balance out that slight height difference that was due to the old pagoda wood having some "movement" over the past 10years.
And, they're up - I nailed some end pieces of wood into place to hold the panels in place, I will need to fit some top/side brackets to stop any storm winds from getting underneath (again) and lifting them off.
Right, now to focus on that dodgy container setup - got distracted by a butterfly!
I was hooking up the 2 batteries, making sure that the MPPT controller negative cable went to a different battery to the positive, this will force the current to get pulled through both the batteries rathre than just the one. (This was the start of me being sceptical about that "red tiger" battery)
A quick test connection of the solar panels. Yes, I connected them up in SERIES. I appreciate there are numerous YouTube videos on how to setup in series versus parallel and I get it, I really do. I'm also waiting on getting the extra cables to be able to do the parallel config.
My simple explanation of why you would use one versus the other - that seems to be missing on all the explanations? (You get 10-25min videos showing you HOW to set these up, but no real explanation of WHY you would do it either way).
Here is my simple thinking explanation:
SERIES: more Volts!
PARALLEL: more Amps!
What does that really mean? Well, there is an equation:
What is it I am looking for? Well, at the moment, anything more than 0v or 12v will be good.
My view is that by connecting the solar panels in SERIES, we add up the volts from each panel, but the Amps stays the same (or if they vary, it is the lowest amp value). For me, this will be 18v+18v+18v=54v and because they all have 5.5amps, that stays constant.
If connecting in PARALLEL, we keep the voltage the same, but the Amps add up, so this then becomes 18v=18v=18v=18v and 5.5+5.5+5.5=16.5amps.
The question becomes, when do you use one versus the other? and this is where all the YouTube videos become a bit, "well, it depends" and they wander off or ignore this. The answer is, "well, it depends!"
It does come down to the "what are you wanting to achieve?" question. For me, I want to be able to power my pond 24/7 off-grid. In order to do that, I need to be able to power the following:
1 x 35w pump (waterfall)
1 x 25w pump (filtration system )
1 x 15w pump (for UV light & 2nd waterfall)
1 x 35w UV light (for clear water/bacteria)
= 110-111watts of power needed
SERIES: Volts = Watts / Amps : Volts = 110 / 5.5 = 20
PARALLEL: Amps = Watts / Volts : Amps = 110 / 18 = 6.1
Here's where I've lost the thread & have forgotten what it was that I was attempting to show / prove? I think that basically, if I want to produce more Volts I opt for SERIES and if I want to opt for more power/current then I opt for PARALLEL. I actually want/need more power, I think?!? This will come out from experimentation.
For now, I'm in SERIES and I'm just happy stuff appears to be working and matches some of my logic:
Woohoo! We have 50-ish volts coming in from the solar panels and it's pumping that voltage into the batteries, pushing it up into the 13volts range - first time that high a number has ever been shown (this is where that "red tiger" battery niggle started to itch the back of my brain)
Even more, wow! That level of voltage / amps is from that level of sunshine. Oh yes, there is also the "shading" issue with SERIES - if any part of any of the solar panels gets covered by shade and the voltage drops, that drops the entire input voltage. So, no shade allowed - which is why I put the panels up in the air away from any shade....except that tree and that bamboo - but they belong to the neighbour, so cannot do much about them.

I drank a cup of tea and merely watched the voltage going up and down slightly for the batteries.
I fitted the 50amp fuse between the MPPT controller and the main battery (the decent / proper leisure battery that weighs about 3 tonne!), it was at this angle I noticed the eye/status thingy on the "red tiger" battery was actually showing as black and not green. Black meaning it needs t be charged. Little odd seeing as the voltage is showing so high. (sceptical brain itching event occurring again).
I then had another cup of tea and sat watching everything again... I noticed that the battery voltage was slowly dropping, I fitted the 40amp breaker fuse/switch between the solar panels and the MPPT controller - this allows me to cut off the solar panels power if I need to.
BTW - as I have learnt (and heard quite a few times on YouTube), you should connect the battery power to the MPPT controller FIRST and then the solar panels - having this breaker really helps with that - although I really need a breaker for the batteries too, to save having to unscrew and pull out the cable each time. However, in the future I don't anticipate disconnecting / reconnecting as much.
I found the greenhouse weatherproof covering in the garage! yay! now I can get rid of those really useful container boxes! The MPPT controller does have a temp. gauge, so I can monitor the temp. inside there, if it gets too hot I can rig up a Raspberry Pi to trigger a relay that then auto-unzips the flap - or just fires up 2 re-purposed computer fans that suck in cold air and blow out the hot, one at the top, one at the bottom... also, might even be an arduino. we'll see. That'll be in part 3 :-D
I even knocked a small hole (for now) so that I can monitor the remote panel from within the kitchen:
Now, next job - cable tidying:
Not the best, but good enough for now. And now were all done...... I plugged in the filtration pump and let that carry on being connected to the mains power whilst I use the solar to re-charge the batteries.
Hmmmmm....the batteries seem to be dropping down as time goes on. There is no drain from the inverter as it is not powered on and I have nothing connected, so this really got my brain itching.
I kept an eye on the readings...... and then when I came down into the kitchen first thing in the morning, the battery reading was 12.6v - that is equiv. to being dead / flat / kaput. Lithium would be okay, but for sealed lead acid batteries this is dead zone, not totally fried, but down in the 10-20% left zone.
I removed the "red tiger" battery and went and purchased another "proper" leisure battery - eeekk, that was another £145... I did say this wasn't a saving money exercise, didn't I? I also say "proper" as I started to question the "red tiger" battery.
I actually purchased it from ebay. yes, I know..I know... but it was "cheap" and I'm now learning why.
The give-away should have been that the one advertised was for 130ah and this one is 100ah - yes, I note that they have a returns policy, I missed the window as I was faffing about for too long. I suspect that if this was a genuine leisure battery then when I was experimenting previously and I drained the batteries down to 10.9v or 11.8v, I did non-recoverable damage.
I had read / heard that if you connect 1 good abttery and 1 bad battery, the bad battery will "pull down" the good battery and you'll never get the level you are looking for. As an experiment, I thought I would just connect up a single known to be good battery:
Well, what do you know:
I was getting consistent 13.4v readings from the battery - that's more like it!
So, in went number two, good battery, remembering to stick the negative and positive cables onto different batteries:
All wired back up and functioning as it should. 53v, that's close enough to the 54v calculated earlier:
The batteries are around the 13v mark, with an average of 6.1a, again close to what we calculated earlier:
..and it was about 20degrees. note the battery bars shown here show about 50% full - I assume that is due to the new battery, no idea how long it has sat on the shelf or whether it was only 1/3rd charged (
like they do with the lithium batteries)
Back to kitchen watching of the remote panel viewer. That's more like it!
Wow! it was cranking up the input into those batteries - the first time I had ever seen ALL the battery bars indicating FULL!
Now to test with some real power usage:
As mentioned in part 1, I got myself a device that allows me to see the Watt usage - I plugged in the filtration pump which I can confirm is pulling around 25watts - it's reading a bit lower, but we'll round up. The MPPT controller was giving these strong readings after 10 mins:
The sun was making itself known at this point also, so it does look like pass-through is happening, where the amount of power coming in is more than what is going out, so the batteries are getting charged up and not really being used - hopefully that will continue and then I will be able to work out just how long the batteries will last overnight... if they last over night!
2 x x100ah batteries = 200ah. 200amp hours of power. How many amps am I going to be pulling over a 12 hour period of time? (ie. between sunset and sunrise), maybe I need to rig up some timers on the plugs, so I only power up the UV light between certain hours during the daytime - we'll see, that's a part 3 item right there!
Here's a reminder of what is now being SOLELY powered by the solar panels and batteries:
Waterfall on left (questionable whether that will be running 24/7, maybe just during the day)
Filtration pump and water air-ation in top middle - must be on 24/7.
Waterfall and UV lamp on right.
Fish - hiding!
(...and yes, that is a stone horses head over by that tree - you never know when you might need to put one inside someones bed...)
A nice FULL 13.7volts of battery storage power ready to be used - wow! I think that brain itching was worth it - the "red tiger" battery was faulty / pulling the good battery down. By replacing it with a good one, this is where I expected to be. Awesome!

And there it is in all it's glory. I just need to add the
Automatic Transfer Switch - so that if the batteries do dip below a specific voltage range, mains power will kick in and then allow the batteries to charge back up from the solar panels and when they have got back up to fully charged, the power will flip back over to them.
Obviously, I don't want to rely on this too much as the purpose is to run the pond from solar power - however it will take a few more weeks of trial and error / testing / data gathering to work out how to optimise the power in versus the power out. Also, the weather change for autumn / winter is going to make things interesting!
If I were still drinking alcohol I would raise a glass to myself and congratulate myself on a job well don - eventually!
..and there will be a part 3, as I need to gather data about the usage of SERIES and then repeat the setup but in PARALLEL (I might even fit 40amp break switch fuses between each solar panel to prevent them from over-surging and potential fire hazard - no-one wants to burn down their setup and/or kitchen / house!)
I also need to get another solar panel (or two) from eco-worthy, I have 3 "spare" inverters and a 12.8v 50ah Lithium battery that needs to be used - potential for powering the hot-tub?...
I also have a RS485 to USB converter cable to hook up and connect to a Raspberry Pi - or other device, in order to gather data about the stats of what is going on. I can then potentially hook that up to Arduino devices that can then be hooked up to relays to perform certain tasks.... this could be an ongoing project :-D


Comments
Post a Comment