Raspberry Pi Pico W powered K9 - Robo Pico board
After owning a couple of K9 toy robot dogs for about 10 years.... and never really getting anywhere with them - okay, that's a little unfair, I did previously fit a Pi W with a MotoZero 4xDC motor controller board into one of them, but didn't progress much further. One of them moved around onto different shelves, whereas the "more complete" and original one stayed as a shelf-ornament.

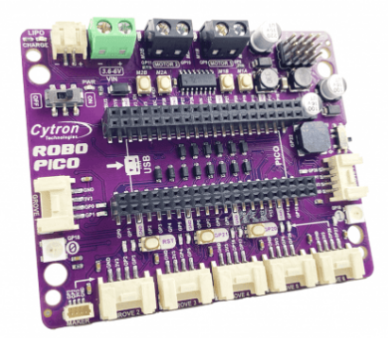
That is until this week... this was the week when the stars aligned and the universe was at the point where it needed to be. I received, in the post, the Cytron.io ROBO PICO. I say, I received, like it was just randomly sent to me - no, it wasn't I bought & paid for it, with my own money, from ThePiHut.com
The board is quite nifty & pretty much what I've been wanting for a Raspberry Pi based board since the days when I used to use Arduino boards from DFRobot.com - now, we ARE going back 8years or more and that robot still exists, currently a bit dusty, but sitting on top of my HP laser printer...as with all things, if you wait long enough, people end up making what you want/need.
That is the case for the ROBO PICO board. It is pretty awesome.
and HERE IS THE LINK TO THEPIHUT.COM - yes, that does say £14.50 (with £3 P&P) - still that IS a very good price for what you are getting.

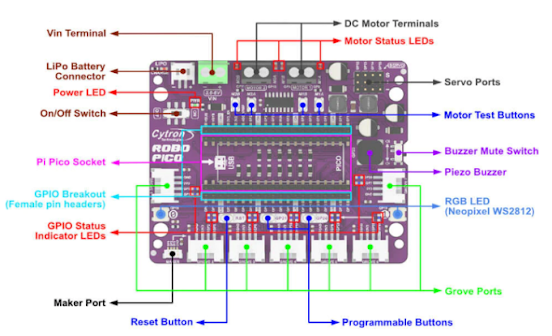
I won't duplicate the same info. from either website, go check them out yourself for more - but in essence, you can connect 2xDC motors, 4xServos, 7xgrove connector devices assigned to specific GPIO Digital and Analog pins, as well as being able to connect directly to the Pico GPIO pins too.
Oh and the other lovely feature, you have "debug" buttons on the board - yep, you can hardware debug, so you can "test" the device you have connected to make sure that the hardware part is working fine - then you know it's your software that is faulty, that's a nice touch.
So, what did I do with it?
Well, I stripped down the K9 dog and decided to hook-up the DC motors - that's where I found the original DC motors in the K9 were a bit kerput!, luckily I had some brand new Dc motors the same size that would fit snuggly inside the existing casing - now that did amuse me that the K9 hd old fashioned plastic gearing mechanism for turning the wheels - I was going to bypass them completely, but then decided to leave it in place - it's kind nice having the really noisy / loud clunking / whirring clatter of the cogs and gears kicking into life when the motors power up.


I then decided to hook up a few LEDs into a few places, one being a clear light at the top underneath the 'keypad' as that was just semi-transparent and had different colour plastic, the other was a hole in the side of the K9, that previously housed a switch of some sort, but had been lost - but a big LED would fit just perfect in the gap. I did also hook up a little red LED into the "eyes", but I think I either accidentally disconnected a connector or blew the LED (of course, I didn't have a resistor inline) - I'll find out when I take it apart again, as I inevitably will do.


From code, which I'll explain in a minute, you can control the turning on/off for the LEDs, so you can make it flash - you can also turn on/off and cycle the onboard 2xRGB lights too - which is nice.
All in all, it's pretty simple to get up and running, once you've soldered the legs onto a Pico W (ah, the W comes in handy shortly) and slotted it into place. Let's say, the Pico W is about £6-ish, so all in with a bit of wire, LEDs, some solder and some time, for < £25 we now have a functioning robot that we can control from a web-page that the Pico W hosts and makes available on the local network... sweet.
Okay, so what do you need to set this up?
First things first, head over to HERE and download the latest version of the CircuitPython UF2 - yes, you can get back up off the floor now, I did indeed just said, "go and get a Python .uf2 file" - sometimes, as I've also said before, you want to get up & running fast, so you use paper & cardboard to prototype BEFORE you then move onto making it out of metal/steel. To me, "C" code is metal/steel and "Python" is paper/cardboard. I'm prototyping here, so I want fast & dirty, CircuitPython is just that. It'll do to playing around, for now. :-)
Once you've dragged the .uf2 file onto the Pico, it'll start and you'll see there is a [+]lib folder and a code.py file.
Basically, whatever you put in the code.py file will get executed when the Pico boots up. If the Python code needs any libraries, it'll look in the /lib folder for them...and where do you get them from?
Well, you download the LIBRARY files from HERE. Now, taking note of the .uf2 file above, I was using v8.2.4, therefore I needed to download the library files for v8.x.
This downloads a .zip file, just extract it and you'll see it has a few folders within it - look for the /lib folder. You don't need to re-compile or build anything (unless you really want to), so you can then copy either the individual xxxx.mpy file or the /folder_name into the CIRCUITPY drive /lib folder. Note, that the files are compiled/compressed MPY files and not straight PY files.
Right, so we have the Pico ready to go, we have the library files, ready to go... what do we do now?
Well, Cytron has a great set of web-pages that take you through using each part of the board - I was actually VERY impressed with this, very simple and efficient explanations and easy guide to see how to use each part of the board.
Here is a LINK to the first article (use the navigation on the top-right to step through the other articles)

Yes, they do even have the IoT HTTP Server example, bottom-right, that I then lifted & modified to then be able to control the DC motors too. Everything just worked.
Okay, so, maybe everything didn't quite work, but that was not he fault of the ROBO PICO board, as it turns out. I was following this article:

and I was using the very super simple code provided - it was literally 3 lines of code! and all I was getting back was 0.051cm or 0.034cm as readings - I was using the Grove port 4, as shown in the left-hand image above.
Now, I had been using this same device on an RPi4 earlier, except that was a bit more complex, it was using some resistors for either the Trigger or the Echo. I has used "proper" Python (my god, did I just write that?) and that was working, I had even used Node-Red RPi nodes to do the same thing and the device appeared to be working okay, I will have to re-check to be sure.
I did have 2 of te HC-SR04 devices that I bought about a year ago, one of them is totally dead/duff - so I don't hold out much guarantee that this other device is much cop. I've ordered 5 more that should arrive tomorrow, so I can easily switch the device out and try again. I'm hoping that a 5-1 ratio should give me at least 1 good device for £10 :-D


So, the articles above do give you code snippets that you can copy and paste into Thonny and save as code.py each time and try them out - but you can also get the GITHUB repo of the files too. I found that for the HTTP Server to work, I needed to download the /lib folder from the github repo and use those files and it then worked okay.


Am I finished? no, far from it - I'm just getting started. I want to get the distance sensor working, so that I can then write the simple code for self-navigation/driving for the K9. I want to be able to put it down and just "let it go explore", let it drive around on it's own, just doing simple obstacle avoidance so it can work it's way off down the hallway... and then look to hookup an RPi camera, then bring some vision processing into the equation - this I might do on the Pico itself, but I might offload it to a beefier RPi 4, don't know yet. I do have a Husky and a PIXY camera device somewhere in a box (yes, they are also 5-8yrs old now!) I have audio capabilities, so I can "speak", maybe add a microphone for "listen" too? I do have some hardware for that in another box too. I'd potentially also like to add a little 1" OLED screen into the side of the K9 as it has a perfect indentation for it, be handy for debug outputs too.
Also, as I'm using a Pico W...I have the ability to connect to a network - therefore I can access "other things", including software running on other machines, could call APIs, could do that image recognition or even a localGPT/privateGPT lookup and do something with that too?
Before, all of that, I need to re-instate a proper ON/OFF switch as I seemed to have forgotten about that, it's either totally OFF or always ON...oh and maybe do something about putting the wiggly radar ears back into motion, along with the waggly tail... I have enough Grove port connectors to control everything.

The only negative I would give the board is that if you are a bit ham-fisted like me and you handle the board whilst it is running, you can very easily short out the connectors on the rear of the board with your fingers, this shows itself by lighting up the blue LEDs for the GPIOs, as I say, not a massive negative, but is a little alarming when setting things up. Once the board was inside the K9, it was behaving perfectly okay.
UPDATE:
So, the 5xnew HC-SR04 devices arrived, swapped one out, dropped the code into place and wouldn't you know it:


Comments
Post a Comment