MobileFirst v7.1 oAuth JMeter Performance Testing Adapters
Well, "MobileFirst v7.1 oAuth JMeter Performance Testing Adapters" is a bit of a mouthful, what does it really mean?
You have installed and setup the MFP v7.1 Servers (the version is important here, as v7.1 is the first version of the product to use session-independent mode and oAuth as a security challenge-handler mechanism).Session-independent mode just means that you don't have to have "sticky-sessions" setup in the Load Balancers (like you used to have to do), and that the requests from the client/device can come through any route to the MFP Server software - I think it boils down to the fact that the "important stuff" is now stored in the backend database, so long as that is available and accessible, it becomes the source of truth.
oAuth just means that a request is made from the client/device to the MFP Server to access a resource, such as an Adapter, the MFP Server requests a unique token from the client/device to identify it, it then also creates a token, shares that with the client/device and the client/device then makes the original request again passing those tokens which the MFP Server verifies to ensure that the client/device is authorised to call the Adapter. If everything is okay, the original call is made to the Adapter and the response is sent back to the client/device. This is shown a little bit later on in some diagrams that are much easier to look at that the text, but you get the idea.
I may have over-simplified these explanations or not explained them in 100% detail, but you get the idea, if not go visit the InfoCenter or this other Blog article by Nir Grande.
In order to Performance Test the MFP Servers, well, in truth you are wanting to performance test calling the Adapters (in a controlled manner) to allow you to monitor the MFP Server Application Server (usually WebSphere Application Server - Network Deployment [WAS ND] or BIG WAS as I prefer to call it) and determine if your current settings will cater for your expected load or whether you need to tweak the settings, such as Threads or JVM Heap size values.
So......where do you start?
Well, the first place would normally be, the InfoCenter - but that article, as it states, is for MFP Server versions before v7.1. "Where does it say that?", it's subtle, it says, "session-dependent-mode" ie. prior to v7.1. You could do what I did and totally miss that nugget of information and carry on, but you will only waste some time. Instead, you should Google again and you will find this Blog article by Nir Grande (who is a very nice and helpful chap).I would suggest that you read through the article (rather than start following it) as it explains WHAT is going on and HOW it is setup. But, all you really need to do is:
- download JMeter
- import the .jmx test plan
- tweak the variable values
- execute your SQL commands
- import your .wlapp/.adapters
- and run the JMeter test....
I say, "all you need to do is". Let's walk through that now. The Blog article from Nir Grande is great as it explains all the nitty gritty details of what is setup in the .jmx test plan and why it is needed, but it is a bit like telling you how "the internals of the internal combustion engine is working" when all you really want & need to know is "how do I drive the car".
We'll use the files that Nir Grande provides at the end of his Blog article and run through a typical setup. Now, as I'm assuming that we're playing with the big boys now, we'll use:
- Oracle database (requires slightly different SQL than the DB2 SQL)
- WAS ND (setup for HA and Clustering)
- IHS (HA setup, but not really too relevant here)
- all running on RHEL
Let's get going
First of all we need to download and setup JMeter (if you don't already have it). Visit JMETER and select to Download the correct version for your platform.A pre-req is to have Java installed onto the machine you wish to run JMeter from (c'mon, really, you should have that already). Setting up JMeter is pretty straight forward. Just extract the zip file and execute the jmeter files located inside the /bin folder:
(On my Mac, I had to "chmod +x jmeter" to allow executing the file)
Unzip the perftestfiles.zip that you downloaded and you will see that you have a file: jwssigner.jar
Copy that file to the /jmeter/lib/ext folder (as we'll reference it later)
Now run the ./bin/jmeter executable (from command-line or double-clicking on it)
Select File/Open, select the java_stateless_grantcode_blog.jmx file (you can save and rename this to something catchier later on, after you've made you changes)
You should now see the following JMeter test plan laid out for you:

Switch over to the WAS Admin console and make sure that the MFP product .war files and the runtime test01.war file is running:

Okay, there is no rocket-science here, just create a new basic Hybrid project either via the MFP Studio (Eclipse) or from the MFP CLI. It can just be a totally basic "Hello World!", it doesn't matter.
Then create an adapter (or two), they can just return hard-coded JSON data OR they can connect to something real. Build/Deploy the project, navigate to the /bin folder and get the required files.
(Personally, I use a test runtime/.wlapp/.adapter to make sure everything is working as it should and then I switch over to using a proper project runtime/.wlapp/.adapter, as this makes sure that if I'm chasing issues, I know that they are related to the project and not JMeter).
Then, when you login to the /worklightconsole you upload the .wlapp/.adapters and will see them in the runtime as shown here:


Before we get carried away, as stated by Nir Grande, we need to manually populate some data into the Oracle database. In his blog posting he provides the SQL for DB2 and even a stored procedure to create a lot of data entries. As we're using Oracle the SQL needs to be modified slightly.
insert into CLIENT_INSTANCES (client_id, wlapp_id, wlapp_version, environment, public_key, device_id, device_os, device_model) values ('400000' ,'test01','1.0','ANDROID',to_blob('30819F300D06092A864886F70D010101050003818D00308189028181009A8757DC39A58B28210FC8367385B2920C02C647C4A82411FFD5B0C0B60985EAE4A785760D1CB8213E01B1AABBA4D71031D769387F62D501690CF4E870D9A8E78A9A613E112CA9759B40C4F839E84E502880EEA56B5A316971C3E7D270A003DF4453FC4FC69247DD2B7204724599D60335B6F542C7FDD84380B1B7183E23A2C90203010001'),'400000','4.4.2','Tony Stark750');
insert into CLIENT_INSTANCES (client_id, wlapp_id, wlapp_version, environment, public_key, device_id, device_os, device_model) values ('400001' ,'test01','1.0','ANDROID',to_blob('30819F300D06092A864886F70D010101050003818D00308189028181009A8757DC39A58B28210FC8367385B2920C02C647C4A82411FFD5B0C0B60985EAE4A785760D1CB8213E01B1AABBA4D71031D769387F62D501690CF4E870D9A8E78A9A613E112CA9759B40C4F839E84E502880EEA56B5A316971C3E7D270A003DF4453FC4FC69247DD2B7204724599D60335B6F542C7FDD84380B1B7183E23A2C90203010001'),'400001','4.4.2','Tony Stark750');
insert into CLIENT_INSTANCES (client_id, wlapp_id, wlapp_version, environment, public_key, device_id, device_os, device_model) values ('400002' ,'test01','1.0','ANDROID',to_blob('30819F300D06092A864886F70D010101050003818D00308189028181009A8757DC39A58B28210FC8367385B2920C02C647C4A82411FFD5B0C0B60985EAE4A785760D1CB8213E01B1AABBA4D71031D769387F62D501690CF4E870D9A8E78A9A613E112CA9759B40C4F839E84E502880EEA56B5A316971C3E7D270A003DF4453FC4FC69247DD2B7204724599D60335B6F542C7FDD84380B1B7183E23A2C90203010001'),'400002','4.4.2','Tony Stark750');
insert into CLIENT_INSTANCES (client_id, wlapp_id, wlapp_version, environment, public_key, device_id, device_os, device_model) values ('400003' ,'test01','1.0','ANDROID',to_blob('30819F300D06092A864886F70D010101050003818D00308189028181009A8757DC39A58B28210FC8367385B2920C02C647C4A82411FFD5B0C0B60985EAE4A785760D1CB8213E01B1AABBA4D71031D769387F62D501690CF4E870D9A8E78A9A613E112CA9759B40C4F839E84E502880EEA56B5A316971C3E7D270A003DF4453FC4FC69247DD2B7204724599D60335B6F542C7FDD84380B1B7183E23A2C90203010001'),'400003','4.4.2','Tony Stark750');
insert into CLIENT_INSTANCES (client_id, wlapp_id, wlapp_version, environment, public_key, device_id, device_os, device_model) values ('400004' ,'test01','1.0','ANDROID',to_blob('30819F300D06092A864886F70D010101050003818D00308189028181009A8757DC39A58B28210FC8367385B2920C02C647C4A82411FFD5B0C0B60985EAE4A785760D1CB8213E01B1AABBA4D71031D769387F62D501690CF4E870D9A8E78A9A613E112CA9759B40C4F839E84E502880EEA56B5A316971C3E7D270A003DF4453FC4FC69247DD2B7204724599D60335B6F542C7FDD84380B1B7183E23A2C90203010001'),'400004','4.4.2','Tony Stark750');
insert into CLIENT_INSTANCES (client_id, wlapp_id, wlapp_version, environment, public_key, device_id, device_os, device_model) values ('400005' ,'test01','1.0','ANDROID',to_blob('30819F300D06092A864886F70D010101050003818D00308189028181009A8757DC39A58B28210FC8367385B2920C02C647C4A82411FFD5B0C0B60985EAE4A785760D1CB8213E01B1AABBA4D71031D769387F62D501690CF4E870D9A8E78A9A613E112CA9759B40C4F839E84E502880EEA56B5A316971C3E7D270A003DF4453FC4FC69247DD2B7204724599D60335B6F542C7FDD84380B1B7183E23A2C90203010001'),'400005','4.4.2','Tony Stark1000');
insert into CLIENT_INSTANCES (client_id, wlapp_id, wlapp_version, environment, public_key, device_id, device_os, device_model) values ('400006' ,'test01','1.0','ANDROID',to_blob('30819F300D06092A864886F70D010101050003818D00308189028181009A8757DC39A58B28210FC8367385B2920C02C647C4A82411FFD5B0C0B60985EAE4A785760D1CB8213E01B1AABBA4D71031D769387F62D501690CF4E870D9A8E78A9A613E112CA9759B40C4F839E84E502880EEA56B5A316971C3E7D270A003DF4453FC4FC69247DD2B7204724599D60335B6F542C7FDD84380B1B7183E23A2C90203010001'),'400006','4.4.2','Tony Stark1000');
insert into CLIENT_INSTANCES (client_id, wlapp_id, wlapp_version, environment, public_key, device_id, device_os, device_model) values ('400007' ,'test01','1.0','ANDROID',to_blob('30819F300D06092A864886F70D010101050003818D00308189028181009A8757DC39A58B28210FC8367385B2920C02C647C4A82411FFD5B0C0B60985EAE4A785760D1CB8213E01B1AABBA4D71031D769387F62D501690CF4E870D9A8E78A9A613E112CA9759B40C4F839E84E502880EEA56B5A316971C3E7D270A003DF4453FC4FC69247DD2B7204724599D60335B6F542C7FDD84380B1B7183E23A2C90203010001'),'400007','4.4.2','Tony Stark1000');
insert into CLIENT_INSTANCES (client_id, wlapp_id, wlapp_version, environment, public_key, device_id, device_os, device_model) values ('400008' ,'test01','1.0','ANDROID',to_blob('30819F300D06092A864886F70D010101050003818D00308189028181009A8757DC39A58B28210FC8367385B2920C02C647C4A82411FFD5B0C0B60985EAE4A785760D1CB8213E01B1AABBA4D71031D769387F62D501690CF4E870D9A8E78A9A613E112CA9759B40C4F839E84E502880EEA56B5A316971C3E7D270A003DF4453FC4FC69247DD2B7204724599D60335B6F542C7FDD84380B1B7183E23A2C90203010001'),'400008','4.4.2','Tony Stark100');
insert into CLIENT_INSTANCES (client_id, wlapp_id, wlapp_version, environment, public_key, device_id, device_os, device_model) values ('400009' ,'test01','1.0','ANDROID',to_blob('30819F300D06092A864886F70D010101050003818D00308189028181009A8757DC39A58B28210FC8367385B2920C02C647C4A82411FFD5B0C0B60985EAE4A785760D1CB8213E01B1AABBA4D71031D769387F62D501690CF4E870D9A8E78A9A613E112CA9759B40C4F839E84E502880EEA56B5A316971C3E7D270A003DF4453FC4FC69247DD2B7204724599D60335B6F542C7FDD84380B1B7183E23A2C90203010001'),'400009','4.4.2','Tony Stark1750');
insert into CLIENT_INSTANCES (client_id, wlapp_id, wlapp_version, environment, public_key, device_id, device_os, device_model) values ('400010' ,'test01','1.0','ANDROID',to_blob('30819F300D06092A864886F70D010101050003818D00308189028181009A8757DC39A58B28210FC8367385B2920C02C647C4A82411FFD5B0C0B60985EAE4A785760D1CB8213E01B1AABBA4D71031D769387F62D501690CF4E870D9A8E78A9A613E112CA9759B40C4F839E84E502880EEA56B5A316971C3E7D270A003DF4453FC4FC69247DD2B7204724599D60335B6F542C7FDD84380B1B7183E23A2C90203010001'),'400010','4.4.2','Tony Stark1750');
commit;

Now, you will notice that the usage of inserting the Blob into Oracle is NOT as you will find if you just Googled it yourself. You'll find some mis-information, such as this StackOverflow posting that implies you should use the utl_raw.cast_to_raw() command.
This will execute and you'll think, "Great, that works fine" and then you'll move on. Bad move.
Later on, when running the JMeter test, the step "token" (after the "Sign grant code") will always fail and your call to the Adapter will not pass the correct token value and you'll be stumped as everything "looks okay".
Trust me, don't waste your time, just use the SQL command as I've shown here and it'll all work as it should!
As Nir explained the SQL has some values that you need to change to match YOUR project values - I've used "test01" in my SQL above, you need to change this to match your value.
Now, let's switch back to the JMeter test plan. You will need to change the variables used by the test plan and you do that here:
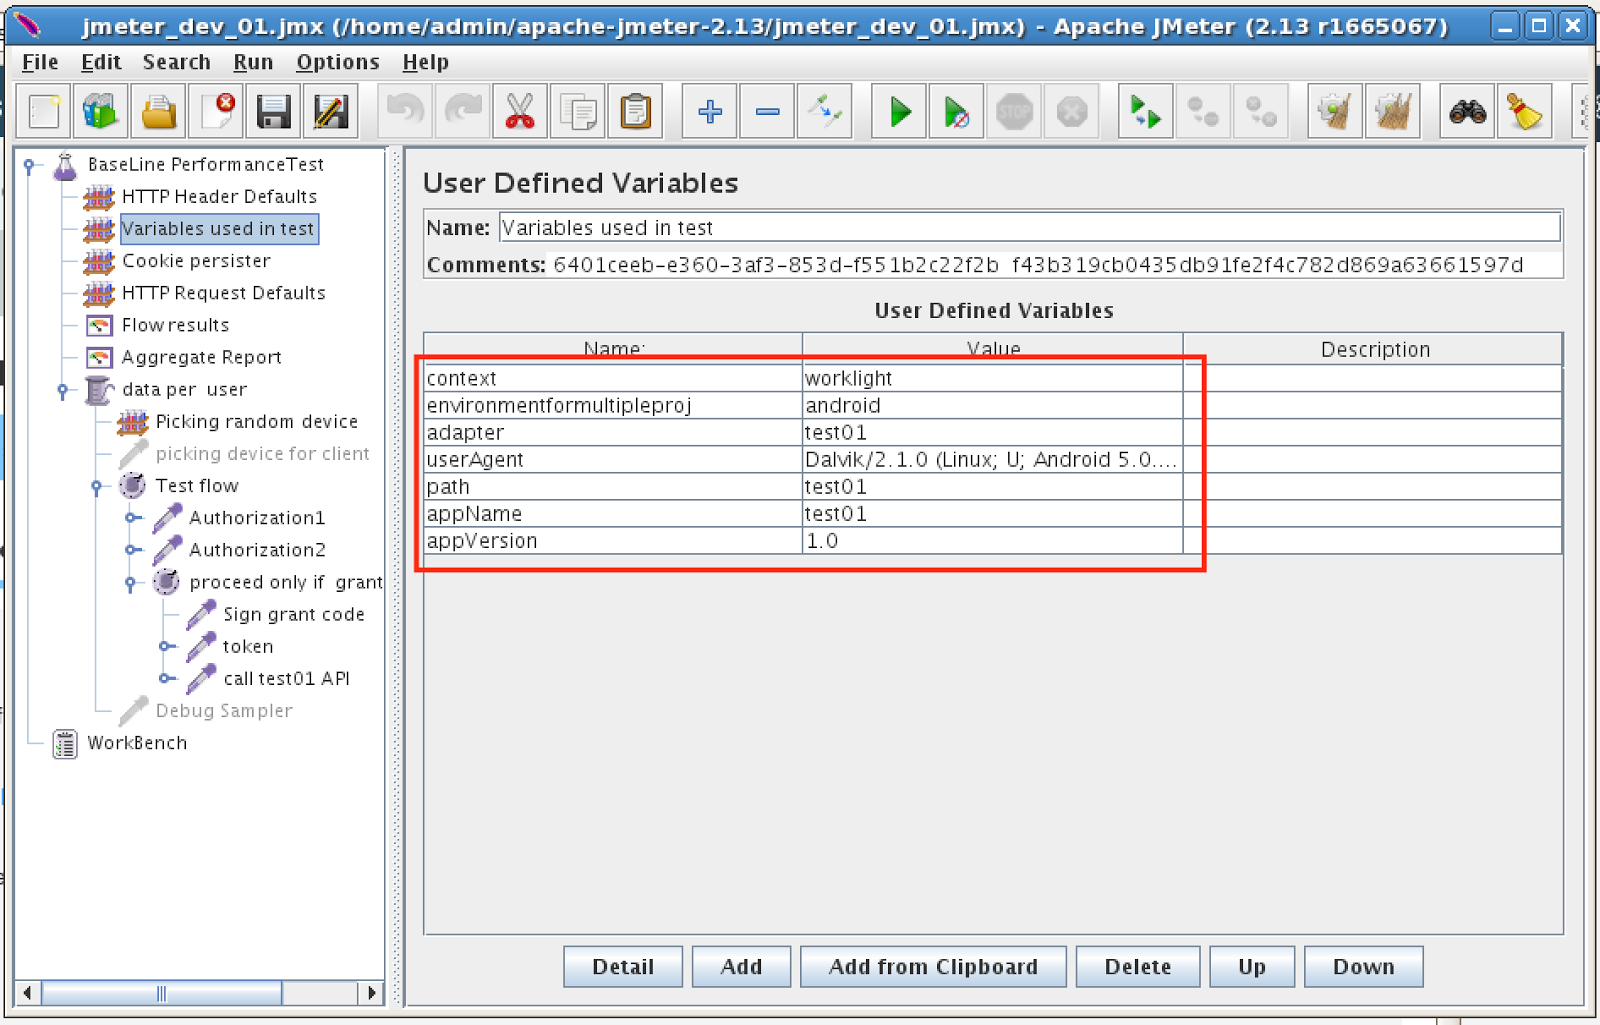
You also need to modify the URL/port to get to your MFP Servers (or to the IHS layer, if you are using Load Balancers)

The actual JMeter test plan that will be executed is contained with the "data per user" section, underneath the "Test flow":

You can modify the Adapters that are going to be called, note the "Path" value specifies the Adapter that is going to be called:

Once you have modified these values to match your environment, you can now actually RUN the test. You do that by pressing the big green triangle/arrow as shown below:

What that actually does is execute through the "Test flow" and the results of the test will appear within the "Flow results" section. It is advisable to click on the "Flow results" first and then click the "Run" button:

As you can see here the "Response data" from calling the Adapter has returned the data that we were expecting.
You can also switch over to the MFP Analytics dashboard and see that your calls were a success too:

Tweaking for testing more than one call
Now you've proven that everything works and that you can make a successful call, how do you "ramp it up?".One of the most important features of JMeter is the Thread Group node. The Thread group allows you to simulate the users that will drive your mobile application. Within Thread group there are a few options that you may set.

First is the threads(Users), which is essentially the number of users you wish to simulate. (Remember though, if you up this number, make sure you have sufficient matching amount of users entered into your Oracle SQL statements).
Second is the ramp-up period, which just means how many seconds JMeter will take until it reaches the maximum number of threads that you specified. This way not all the threads will begin executing at the same time and will be staggered, pretty much how real users using th mobile application will operate.
Thirdly is the loop count, this specifies how many times each thread will execute. This can be set to forever if you wish to run the test continually to see at what point the servers "break". ie. what is the most throughput that your current setup can handle? You can use this as a positive response to then start "tweaking" the WAS ND server settings....


Comments
Post a Comment