Making an Android Mobile device app that uses the IBM Watson Conversation service (as a chat-bot)
As mentioned, in this walkthrough, we'll see how to
1. Download and use the Android Studio (my version was waaaaay out of date, so I started again from fresh and did a new install)
2. How to get the Watson Android Java SDK project from Github, clone it
3. Load the project into Android Studio, modify a few files, remove a bunch of stuff and configure it for accessing the IBM Bluemix platform Watson API services
4. Create the required Watson API services on IBM Bluemix platform and get the credentials to put into the Mobile app
5. Run through a working example on the Android device mobile phone
6. Sit back and just bask in our glorious awesomeness of having just done all the above in less than an hour. Oh yes, let us bask in that awesomeness and think of how we can start to build on these foundations and go further....a lot further....!
Right, let get going on Step 1. As I've got a Mac, these instructions are for a Mac.
Navigate to:
https://developer.android.com/studio/index.html

https://developer.android.com/studio/install.html

Run the App from your Applications folder:

Step 2. Now let's go and get the Watson Android SDK from Github.
If you were to follow the online docs you would see the following sample apps:
https://console.bluemix.net/docs/services/conversation/sample-applications.html#sample-apps
 Now, they are great for getting up and running using NodeJS (one of my other favourite coding platforms) and are great for getting web app based stuff working quickly, but we don't want that.
If you fancy taking a look, go visit and download this Github repo:
https://github.com/watson-developer-cloud/conversation-simple
 This will give you a really good example of how the conversation chat will work from an end user perspective as well as showing you the JSON data that gets sent back and forth.
Here is the live demo: http://conversation-simple.mybluemix.net/
But, this won't really help us with an Android Java application...now, we could spend a fair amount of time attempting to port the code or we could just find something that already exists and extend it.
If you do a quick bit of Googling, you will find reference to the : Watson Developer Cloud Java SDK
https://github.com/watson-developer-cloud/java-sdk
 Whilst that SDK will give you a good example of all Watson API services, as a starter it's a bit too broad for now. We want something specific for Android.
A bit more Googling and we stumble over: Watson Developer Cloud NodeJS SDK
https://github.com/watson-developer-cloud/node-sdk
But, again, we'll bookmark that for later, when we want to do NodeJS development.
A bit more Googling later and we stumble over: Watson Conversation over SMS
https://developer.ibm.com/recipes/tutorials/watson-conversation-over-sms/
We'll save that for later - as that might be a very interesting addition for v2.0.
Ah, ha! Now we find: Watson Developer Cloud Android SDK
https://github.com/watson-developer-cloud/android-sdk

From a command line run:
>git clone https://github.com/watson-developer-cloud/android-sdk.git
Flip back to the Android Studio and select to open the Project.
Step 3. Once loaded, you will need to modify the /res/values/credentials.xml file:
 But, as you will see, you do not have all of the details yet. Also, I've added a new entry for the Watson Conversation service and added the WorkspaceId value here too.
Now, I cannot remember if I changed the gradle.build file or not, so compare your version with this one:
 I added the reference to the gson library as I wandered of for a bit when I was doing the coding and because, in the past, I had used Volley as my JSON library, I assumed that I needed a 3rd party JSON library.... turns out I didn't need it, but I just commented out the usage so I could put it back again later if needed.
I also modified the UI a little bit, as you can see I added a ListView, removed the Gallery and Image display stuff (as we might come back to that later)

Step 4. As stated, this sample assumes you have an IBM Bluemix account and service credentials from: https://console.bluemix.net/
As you can see I've already created many services, but highlighted below are just the one's we need for this sample:

4.1 Create a Watson Translation service
 Click on the [Service Credentials] to get the details you need for the credentials.xml file.
4.2 Create a Watson Speech to Text service
 Click on the [Service Credentials] to get the details you need for the credentials.xml file.
4.3 Create a Watson Text to Speech service
 Click on the [Service Credentials] to get the details you need for the credentials.xml file.
4.4 Create a Watson Conversation service and make sure you have the Car Dashboard demo workspace
 You select the [Service Credentials] to get the details you need for the credentials.xml file:

You select the [Launch Tool] button and it will open in a new window.
You can see, by default you should have the "Car Dashboard - Sample" as a Workspace:

If you select the 3-dots and select "View Details" you should then get access to the WorkspaceId:
 You need this to enter into the credentials.xml file.
If you choose to view the Workspace, you can click through to the "Dialog" tab and choose the first Node to see the [Welcome] message that will be returned in the JSON as shown.
 You can also use the [Preview] to "Try it Out" and see what your utterance matches to.
Now, as I say, switch back to the credentials.xml file and update the values from the services:
Now, let's take a little look at the code changes we need to make and why we need to do that.
The Watson SDK is really cool. I didn't realise initially just how cool it was, I was attempting to parse the JSON that is returned from the Watson Conversation Service using the gson library, whilst this totally worked for me, I then realised that the SDK did that work for me. Phew!
Now, we modify the MainActivity.xml file. First, we add reference to the Conversation library:
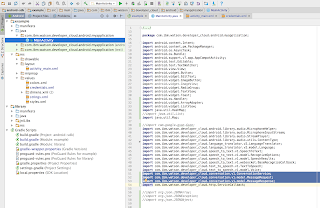 You'll note the commented out gson imports too.
Next, you'll see the variables that we need to create:

Although the screenshot below shows the workspaceId being assigned, it is actually read from the credentials.xml file. We also setup the ListView control too:

Here, we just setup the Buttons and initialise the response variable. The interesting thing is that we call the conversationAPI() method, passing the input.text variable value and the context. Now, the context HashMap is the important thing to remember. Here, the context variable is null.
This initial call to the Watson Conversation Service will return the "Welcome message" that we saw in the Dialog tab, first Node earlier.

The following two methods are the actions that happen when the Buttons are clicked.
The [Send] button does the same as above.
The [Clear] button clears the ListView and calls the Watson Conversation service to get the "Welcome message" again. In essence, it restarts the conversation.

The following code shows that the Init services reads the values from the credentials.xml file:

The conversationAPI() method is the important method here. As you can see we pass it the important variables and it builds the newMessage that is required to be sent.
Then, because we created a conversationService when we initialised earlier, we use that to connect to the Watson Conversation service, connecting to the specific workspaceId and passing the newMessage value.
The smart thing we have to do is use the .enqueue() mechanism, so we call this in an ASYNC way.
When we get a response in the onResponse() method, we get the "response" variable populated with the JSON from the Watson Conversation service.
As we wish to display the data to the ListView we have to use a different thread to the UI thread - it's an Android thing. So we call displayMsg() passing the response JSON as a MessageResponse object:

Ah ha, so as you can see here, we use the WCS API to extract the TEXT that is returned from the Watson Conversation service, then we add this to the ListView in the UI.
We then assign the new context() JSON section to the global context variable - this means that the next time we call the Watson Conversation service we pass the previous context variable - what does this mean? It means we pass back the information that the Watson Conversation service needs to "keep the conversation going", essentially it passes back the conversation_id and other data to keep this working.
As you can see, as I mentioned earlier, I commented out the gson code that I originally created to parse the JSON data. It's not needed as we are using the WCS API to get the data:

The Watson Conversation API is defined at this location and can be used to see the sample Java code as well as examples of the request & response JSON data:
https://www.ibm.com/watson/developercloud/conversation/api/v1/?java#send_message
Step 5. Now, let's see what this looks like on the Android device itself.
future..
Look at creating a NodeJS server-side component that would use Socket.io to handle the communications, the Android code would just call the NodeJS server app via Socket.io and the NodeJS server app would then do the Watson API service communications, rather than the Android app doing a direct connection. The library to use: https://socket.io/blog/native-socket-io-and-android/
I'll also do something with Visual Recognition API too....
I'll come back to this later.
BTW - here's the link to the github repo. : https://github.com/YnotZer0/android_conversation
1. Download and use the Android Studio (my version was waaaaay out of date, so I started again from fresh and did a new install)
2. How to get the Watson Android Java SDK project from Github, clone it
3. Load the project into Android Studio, modify a few files, remove a bunch of stuff and configure it for accessing the IBM Bluemix platform Watson API services
4. Create the required Watson API services on IBM Bluemix platform and get the credentials to put into the Mobile app
5. Run through a working example on the Android device mobile phone
6. Sit back and just bask in our glorious awesomeness of having just done all the above in less than an hour. Oh yes, let us bask in that awesomeness and think of how we can start to build on these foundations and go further....a lot further....!
Right, let get going on Step 1. As I've got a Mac, these instructions are for a Mac.
Navigate to:
https://developer.android.com/studio/index.html

https://developer.android.com/studio/install.html

Run the App from your Applications folder:

Step 2. Now let's go and get the Watson Android SDK from Github.
If you were to follow the online docs you would see the following sample apps:
https://console.bluemix.net/docs/services/conversation/sample-applications.html#sample-apps

If you fancy taking a look, go visit and download this Github repo:
https://github.com/watson-developer-cloud/conversation-simple
Here is the live demo: http://conversation-simple.mybluemix.net/
But, this won't really help us with an Android Java application...now, we could spend a fair amount of time attempting to port the code or we could just find something that already exists and extend it.
If you do a quick bit of Googling, you will find reference to the : Watson Developer Cloud Java SDK
https://github.com/watson-developer-cloud/java-sdk

A bit more Googling and we stumble over: Watson Developer Cloud NodeJS SDK
https://github.com/watson-developer-cloud/node-sdk
But, again, we'll bookmark that for later, when we want to do NodeJS development.
A bit more Googling later and we stumble over: Watson Conversation over SMS
https://developer.ibm.com/recipes/tutorials/watson-conversation-over-sms/
We'll save that for later - as that might be a very interesting addition for v2.0.
Ah, ha! Now we find: Watson Developer Cloud Android SDK
https://github.com/watson-developer-cloud/android-sdk

From a command line run:
>git clone https://github.com/watson-developer-cloud/android-sdk.git
Flip back to the Android Studio and select to open the Project.
Step 3. Once loaded, you will need to modify the /res/values/credentials.xml file:

Now, I cannot remember if I changed the gradle.build file or not, so compare your version with this one:

I also modified the UI a little bit, as you can see I added a ListView, removed the Gallery and Image display stuff (as we might come back to that later)

Step 4. As stated, this sample assumes you have an IBM Bluemix account and service credentials from: https://console.bluemix.net/
As you can see I've already created many services, but highlighted below are just the one's we need for this sample:

4.1 Create a Watson Translation service

4.2 Create a Watson Speech to Text service


4.4 Create a Watson Conversation service and make sure you have the Car Dashboard demo workspace


You select the [Launch Tool] button and it will open in a new window.
You can see, by default you should have the "Car Dashboard - Sample" as a Workspace:

If you select the 3-dots and select "View Details" you should then get access to the WorkspaceId:

If you choose to view the Workspace, you can click through to the "Dialog" tab and choose the first Node to see the [Welcome] message that will be returned in the JSON as shown.

Now, as I say, switch back to the credentials.xml file and update the values from the services:
Now, let's take a little look at the code changes we need to make and why we need to do that.
The Watson SDK is really cool. I didn't realise initially just how cool it was, I was attempting to parse the JSON that is returned from the Watson Conversation Service using the gson library, whilst this totally worked for me, I then realised that the SDK did that work for me. Phew!
Now, we modify the MainActivity.xml file. First, we add reference to the Conversation library:

Next, you'll see the variables that we need to create:

Although the screenshot below shows the workspaceId being assigned, it is actually read from the credentials.xml file. We also setup the ListView control too:

Here, we just setup the Buttons and initialise the response variable. The interesting thing is that we call the conversationAPI() method, passing the input.text variable value and the context. Now, the context HashMap is the important thing to remember. Here, the context variable is null.
This initial call to the Watson Conversation Service will return the "Welcome message" that we saw in the Dialog tab, first Node earlier.

The following two methods are the actions that happen when the Buttons are clicked.
The [Send] button does the same as above.
The [Clear] button clears the ListView and calls the Watson Conversation service to get the "Welcome message" again. In essence, it restarts the conversation.

The following code shows that the Init services reads the values from the credentials.xml file:

The conversationAPI() method is the important method here. As you can see we pass it the important variables and it builds the newMessage that is required to be sent.
Then, because we created a conversationService when we initialised earlier, we use that to connect to the Watson Conversation service, connecting to the specific workspaceId and passing the newMessage value.
The smart thing we have to do is use the .enqueue() mechanism, so we call this in an ASYNC way.
When we get a response in the onResponse() method, we get the "response" variable populated with the JSON from the Watson Conversation service.
As we wish to display the data to the ListView we have to use a different thread to the UI thread - it's an Android thing. So we call displayMsg() passing the response JSON as a MessageResponse object:

Ah ha, so as you can see here, we use the WCS API to extract the TEXT that is returned from the Watson Conversation service, then we add this to the ListView in the UI.
We then assign the new context() JSON section to the global context variable - this means that the next time we call the Watson Conversation service we pass the previous context variable - what does this mean? It means we pass back the information that the Watson Conversation service needs to "keep the conversation going", essentially it passes back the conversation_id and other data to keep this working.
As you can see, as I mentioned earlier, I commented out the gson code that I originally created to parse the JSON data. It's not needed as we are using the WCS API to get the data:

The Watson Conversation API is defined at this location and can be used to see the sample Java code as well as examples of the request & response JSON data:
https://www.ibm.com/watson/developercloud/conversation/api/v1/?java#send_message
Step 5. Now, let's see what this looks like on the Android device itself.
future..
Look at creating a NodeJS server-side component that would use Socket.io to handle the communications, the Android code would just call the NodeJS server app via Socket.io and the NodeJS server app would then do the Watson API service communications, rather than the Android app doing a direct connection. The library to use: https://socket.io/blog/native-socket-io-and-android/
I'll also do something with Visual Recognition API too....
I'll come back to this later.
BTW - here's the link to the github repo. : https://github.com/YnotZer0/android_conversation


Techlancers ranks among the most reliable mobile app development companies in dubai, offering end-to-end solutions from concept to deployment.
ReplyDelete