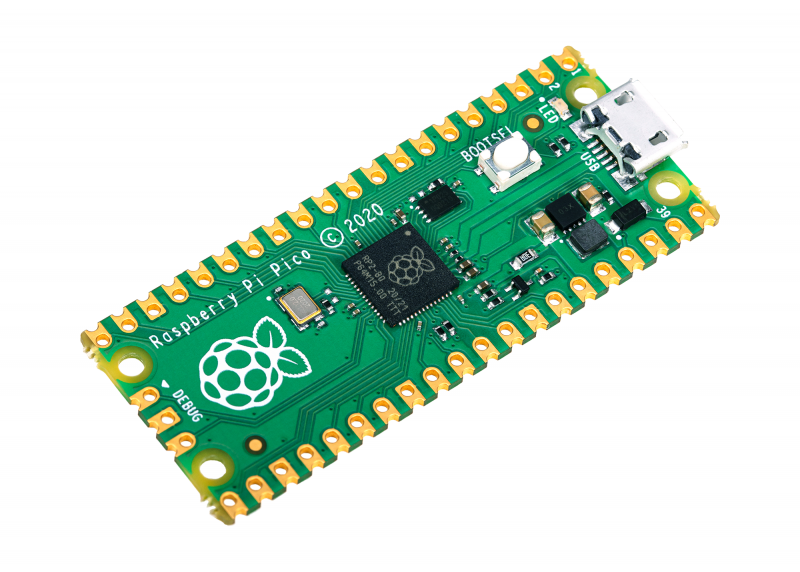
Raspberry Pi PICO board
Ooooo looksie...a new Raspberry Pi board...hang on, for $4? what, what, what now?
https://www.raspberrypi.org/blog/raspberry-pi-silicon-pico-now-on-sale
Let me introduce you to my little friend....the Arduino.

Yes, the wonderful Arduino device that has been keeping geeky people very happy since, well, I don't know exactly (I could look it up, but, y'know...lazy), I've been using them since, must be around the 2005/6 time-frame (thanks Ian Pearce!).
They are a small microcontroller that you code in C, you "can" use an IDE, or you can do all the avrcode commands yourself (if you're hardcore) and basically you write simple C code using a variant of Wiring.
Simple to do, you have a setup() function, where you, setup stuff up, initialise things etc... connect to stuff and then you have a main() and the main() loop loops forever...forever....forever... until you pull the power. Then if you add power, it starts up, executes the setup() and then main() and we're back to looping again.

(darn it: why did I paste an example showing a DIGITAL pin output?!? quick, let's blag it..... "so, as you can see above we are demonstrating the 0 and 1 concept, LED light ON and LED light OFF, nothing in-between, that's what a DIGITAL pin gives you".....phew! think I got away with it)
It was awesome for doing a task or a series of tasks, forever & ever, it was limited by the amount of space you had to run your code in, but most people didn't hit that limit. You can use the code to access sensors & to drive motors -for wheels etc... in fact this is exactly what I was doing back in the good old days when I was building my ArcTuRus robot ( http://tonyisageek.blogspot.com/p/arcturus-v11-build-modifications.html ) - Good God, was that really in 2015! wow....
So, the arduino is really good at working with ANALOG sensors for granular control.

No? still not making any sense....hmmmm....okay, try this one:
You have a wheel on a car, you wish to move it forward & backwards slowly, rolling it back and forth. If you have an ANALOG controller, you can add a 0.01 increment each time and the motor controlling the wheel will move forward that increment and thus you have movement. yay!
Now, if you have a DIGITAL controller, you have a 0 or a 1. So, OFF or ON. you can see where I'm going here. You have a motor that is not on and therefore the wheel is not moving, you now send a signal to the motor as a 1 and the motor goes to the max, full speed ahead in one bang movement. What's the problem with that you say? Well, nothing, but if you go out to your real car, get in it and start it up, release the handbrake, put it into gear (I'm going to assume automatic for this scenario), then you are basically planting your foot to the floor on the accelerator (1)...great! wheel spinning, smoke, noise, awesome stuff..eventually you'll grip and shoot off down the road increasing speed until you need to brake, you will then lift foot off throttle (0).... you stop at the lights, (0), then you switch it to (1) and off we go ahead at near light speed.... you see what I'm getting at.

If only there were some way to have a more granular, fine control that gently increases & decreases the values from 0 to 1 and 1 back to 0.... ah, ANALOG controllers.
I could have used robot arms as a reference, but not as much fun, but if you think about a robot arm having just a 0 and 1, where 0 is down by your side and 1 is out in front, then with digital you're going from side to out front in one go... great you might think, you get the required result...but the engineer in the room says, "but you're mashing up the gearing in the motor driving the arm every time you do that, it won't last long and you'll break it"....same story for the car mechanic.
Right, tangent over. What has that got to do with the Raspberry Pi PICO? Well, you can now use this tiny little board to do that task....(and a lot more too) yay!
Okay, the cynic in me says, well, I have a bunch of arduinos knocking around, I can code C, I have libraries for all the things I use, so what's the deal? Well....the Arduino is usually upwards of £15+, so price point might be a winner here. Now, you may be mistaken and think, haha, also size... well, not really, I backed the KickStarter for the Teensy board (or did I just purchase really really early versions? I can't recall), so this goes to show you can have a small footprint arduino board as well, but nowhere as cheap as the PICO.
Also, and I cannot believe I am saying this, it will help the kids. (eurgh!) They will be able to use a cut-down version of Python (god help us all) to be able to code this device and then also go onto the BIG Raspberry Pi and use the same language to code that... and then once they've grown above the age of 13, they can learn how to do it properly in C code.
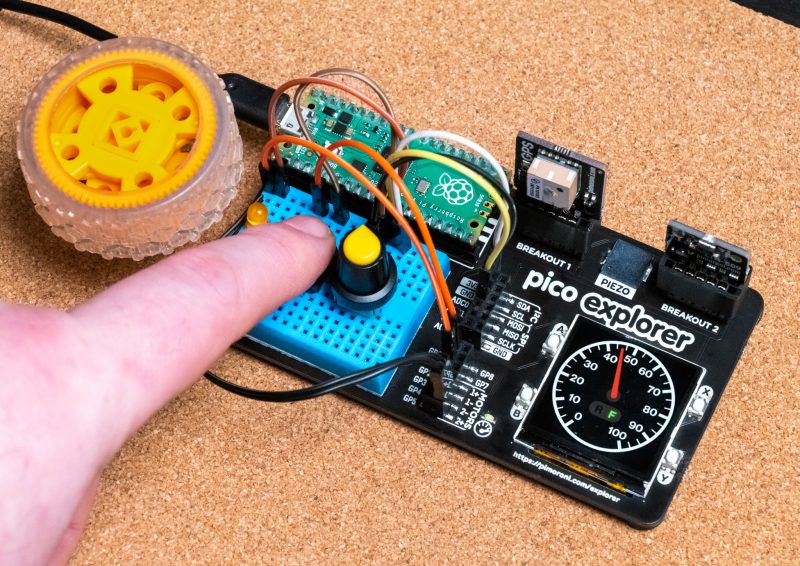
Some of the partners have come up with some good stuff to help
https://shop.pimoroni.com/products/pico-explorer-base


Comments
Post a Comment