Posts

Showing posts from 2017

Using ROS to control GPIO pins on a Raspberry Pi 3

Image
As the title says, it was time for me to document how to do the "simple" task of using ROS (Robot Operating System) to turn an LED on/off (well, we can do a LOT more than that by using the GPIO pins, but as a baseline, it's a starter). Because I've installed ROS onto the Raspberry Pi itself, I can create ROS nodes directly on the RPi. So let's get on with it and create a simple demo to blink an LED using ROS topics from the RPi. First step, we have to download " wiringPi " $ git clone git://git.drogon.net/wiringPi $ cd wiringPi $ sudo ./build The interesting thing is that everyone decides how they are going to refer to the GPIO pins on the RPi ...I just keep track of the physical pin (as that doesn't change!) And here is the GPIO pin layout in relation to wiringPi: https://projects.drogon.net/raspberry-pi/wiringpi/pins/ Now that we've installed the library we're going to be using, let's switch to creating a ROS package...

3D Printer arrives

Image
After much hassle and delays and patience.....the 3D Printer arrived. Well, yes, it arrived on a Sunday afternoon.  Whilst I was out.  At Cheddar Gorge, because, no-one is going to deliver anything on a Sunday afternoon are they? it's safe to go out and get some cheese.... nope.  I came back home and found this box on the doorstep.  Yes, it was very wet and soaking up the water.  I pushed it into the porch.... I smiled and thought of positive things, which as it turns out was the right thing to do. The box had a box inside the box, so the 3D printer was well protected. I did the classic "sweep everything off the dining table" manoeuvre and set about putting it together: I stuck the SD Card in the side and selected a file that ended in .gcode - I had absolutely no idea what it was, but I just wanted to test everything was okay: After running through the warm up and levelling the print bed, it looked like it was time to go: Initially I didn't...

T1ll13 robot step 2.1

Image
Whilst I await on a very slow delivery of a 3D Printer ( yes, I decided to go ahead and buy one and give it a go ), I decided to switch back to the software side of things. I decided that I need to do some work with the XBox Kinect and ROS. After a bit of googling around, I see that as I've decided to use the ROS "kinetic" version and not the "Indigo" version that everyone else has previously used ( that's the older version, btw ), I'd be figuring this out for myself and who knows, I might even help some other people out along the way. I got a bit distracted and it looked like I needed to setup the robot simulator software Apparently I need to install MoveIt! - so, time to fire up the Raspi3, drop to a Terminal and type: $ sudo apt-get install ros-kinetic-moveit $ source /opt/ros/kinetic/setup.bash ( and then !boom! 2hrs of power-cuts just hit my area, probably something to do with the snow, etc... ) http://docs.ros.org/kinetic/api/mov...

BabyX

Image
Baby Driver is a good movie, but this is not what this article is about.... I extracted the bits that I thought were eye-opening from the following article: https://www.bloomberg.com/news/features/2017-09-07/this-startup-is-making-virtual-people-who-look-and-act-impossibly-real Soul Machines wants to produce the first wave of likeable, believable virtual assistants that work as customer service agents and breathe life into hunks of plastic such as Amazon.com’s Echo and Google Inc.’s Home.  https://www.soulmachines.com/ .... .... Mark Sagar’s approach on this front may be his most radical contribution to the field. Behind the exquisite faces he builds are unprecedented biological models and simulations. When BabyX smiles, it’s because her simulated brain has responded to stimuli by releasing a cocktail of virtual dopamine, endorphins, and serotonin into her system. This is part of Sagar’s larger quest, using AI to reverse-engineer how humans work. He wants to get to ...

Cybernetic system 01100011 01111001 01100010 01101111 01110010 01100111 00001010

Image
Cybernetic system 01100011 01111001 01100010 01101111 01110010 01100111 00001010

IBM partner with MIT

Image
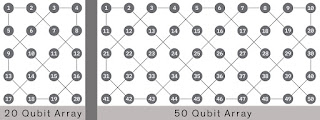
https://www.digitaltrends.com/computing/ibm-and-mit-ai-partnership/ "This work is undeniably promising, but it’s a simple evolution of the hardware we have today. Another, more dramatic option is the use of a quantum computer  to explore the potential of an A.I. Such research is still in its earliest conceptual stages, but the enormous computational power of a large-scale universal quantum computer seems likely to inspire a major leap in our understanding. MIT’s lab will have access to IBM Q , the company’s flagship quantum project. Recently updated to a 20-qubit processor , an even more impressive 50-qubit version on the horizon – hardware that will surely be a real gamechanger when it’s possible to use it to its full potential. This avenue of research is set to be a two-way street. Machine learning will be used to help advance research into quantum hardware, and the results will help scientists push the boundaries of machine learning. ..... The MIT-IBM Wa...

What have you been up to lately, Atlas?

Image
What have you been up to lately, Atlas? https://www.bostondynamics.com/atlas

Quantum SDK, or Quantum Information Software Kit (QISK)

Image
There have been a few updates on the latest updates in the world of Quantum processors: https://spectrum.ieee.org/tech-talk/computing/hardware/ibm-edges-closer-to-quantum-supremacy-with-50qubit-processor https://www.ibm.com/blogs/research/2017/11/the-future-is-quantum/ https://www.ibm.com/blogs/research/2017/10/quantum-computing-barrier/ One of the problems with all this talk about Quantum computers is "How do I actually do something with it?".... https://www.qiskit.org/ Oh, guess what - you can write some Python code too: Here's the TUTORIAL guide

InMoov finger

Image
Today, I decided to get on with putting together the InMoov 3d printed finger.  I wanted to see how good the 3d printing was and how the construction was done for one of the fingers, seeing as I've got to do all of them, I wanted to get to see how they were put together and how they can be controlled by a servo. Well, there's the basics all laid out: After a bit of digging around, I found some acetone ( nail varnish remover to you & me! ), why we'll need that will become clear shortly.... ....as the 3d printed finger parts are ABS, you can use the acetone with a small brush to melt the parts together - there's the finger parts on the right melted together and with the blue joint  material threaded through to hold it all together - works pretty well: For now, time to attach to the base unit: So, this was the original HobbyKing servo I was going to use.  Note those 2 extra circular discs were meant to be used, but they don't fit the servo, so I o...